
Sewing Beginners 101 Basics
Welcome! If you are beginner just getting started in sewing I'm so glad you've stopped by I hope this blog is helpful and we can encourage you along your sewing journey.
In this blog we are going to go over the basics of your sewing machine and how to thread it, the basics of sewing notions including helpful tools, choosing the right needle/fabric and concluding with practice . Sometimes people give up simply because of their machine! Let's see if we can help you get past that.
Getting to know my machine
I think in pictures and help my students visualize things that way as well. I think it takes the intimidation out of things especially when it comes to new concepts like figuring out a sewing machine! So lets break this down.
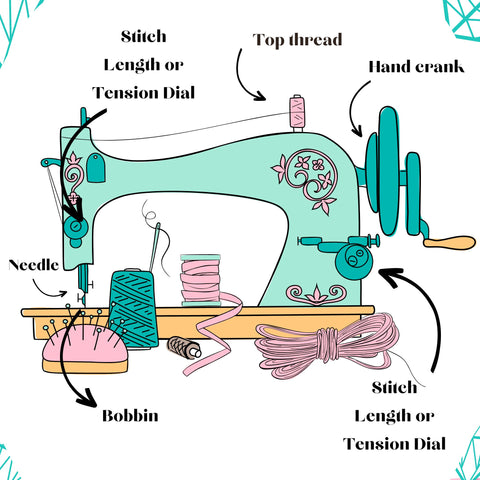
The Top Thread and the Bobbin thread work together to form a loop that's what produces the chain. Imagine they are shaking hands if you will. Now most of the time when you start seeing loops underneath your material or your thread is bunching it's because something isn't going right in this handshake if you will. The bobbin is catching-not threaded right or too loose/tight. In my experience issues with the bobbin tend to make up most of the frustrations new sewing students have. So getting used to threading your machine, and winding your bobbin properly will cut your frustrations in half!
The next thing we are going to look at is the stitch length dial and the tension dial. Now when would you adjust or use either? The stitch length dial helps you create a wide or narrow stitch. I adjust mine when I am sewing knits and want to make a wider edge. Prior to having a serger I used this technique a lot. I made my stitch wider so when the sewing needle zig zagged it was bigger going left to right and the stitches were closer together. Some machines will have a diagram just above their stitch length button showing a straight stitch that goes all the way into a tight zig zag stitch. The more you turn your dial the more you create that zig zag stitch. Zig zag stitches are used for knit fabrics or cleaning up an edge. When would you need to lengthen a stitch? I lengthen my stitch when I'm sewing a gathering stitch. A gathering stitch helps you create ruffles or puckers. On my Pfaff computerized machine I lengthen it to a 6- as far as it can go. You can also use this stitch to "tack" things down if you were doing an applique or quilting project and needed things loosely put down before you quilted or did a satin stitch edging. When would you adjust the tension dial? The tension dial is typically set in between the 4 and 5 reference area. The only time I adjust my tension is when I'm sewing with stretchy fabrics then I adjust my tension down to a 2.8/3.0. If you find your thread is snapping a lot tweak your tension some lowering the number until things sew smoother.
When using the hand crank or hand knob I tell my students to always turn the knob towards you. You won't need to manually turn your hand crank that often, but I do recommend using it when students are attempting to pivot around a turn. To pivot you will use your hand crank to lower the needle into your project. Then lift your presser foot, turn your project. Lower your presser foot and begin sewing again.
My machine has feet? What in the world! Yep! The "presser foot" is the tiny little medal rectangle that guides your fabric along as you sew. You can change out your foot to accommodate different goals. For instance, when installing a zipper you will use a zipper foot, to sew on a button some machines include a button foot and so on. As you become more experienced you can purchase more specialty feet for your machine. I would recommend going to local quilting shops that are certified vendors in your sewing machine brand. Buying feet off of Amazon and Ebay maybe a good deal, but potentially damage your machine.
How do I thread my sewing machine?
If you are fortunate to have a newer sewing machine you will notice instructions lightly etched throughout your machine using numbers to guide you in threading. I am noticing more machines are including two sets of numbers- one number will be for threading your machine. The other set of numbers will be for winding your bobbin when it runs out. For older machines, if you are lucky enough to still have your manual I would recommend reading through that. Threading a sewing machine is often a beginners biggest fear so I tell my students to practice at least ten times getting everything all threaded then taking it out again. Newer models of machines include an automatic needle threader. I have them on my machines, but tend to not use them. When threading the needle, if your machine does not have a light in the needle area, place one of your fingers in back of the needle hole. This will make it easier to see the thread as you thread the needle.
After you have threaded the needle you will need to put the thread through the hole in the presser foot and bring this thread now called a "tail" I know feet, tails it doesn't make sense! Anyhow take this tail and place it towards the back of your machine. Next, take your hand crank rotating it towards you and lower the needle into the bobbin area to catch your thread ( I'm assuming you have already correctly placed your bobbin into your bobbin casing) as you lower the hand crank towards you make sure you hold the top thread, gently tugging to get it to pull up your bobbin thread. You should pull up a loop. When you pull up this loop take a pen or pin of some sort and pull it out until the bobbin tail comes out then place it towards the back. Try not to use scissors as this may cut your thread forcing you to rethread everything again. Now you have successfully threaded your machine! Yay!
What sewing notions would you recommend?
For a more complete list I would recommend reading my top eight sewing notions recommendations. You can find that here. For my top three must have sewing notions I would recommend:
- 2 pairs of scissors- one labeled fabric and one labeled paper
- Good cutting mat- the larger the better!
- Wonder Clips- much better than pins and you don't injure yourself
Choosing the right needle to go with your fabric
I'll never forget this frantic message I received from a sewing student. Help! Everything I am doing is wrong on these alterations! Why is everything shredding as I sew? I'm just trying to hem up these clothes and my thread is bunching. My needle is destroying my clothes I'm ready to give up!
The first thing I think about when I hear this is the wrong needle for the fabric you are trying to fix. In sewing there are many types of needles for just about every type of fabric available. When you have the proper needle, things flow smoothly and when you don't you can guarantee frustration, holes and tension issues. For example: if you are sewing on stretchy fabric and have a thicker needle lets say a denim or leather needle the needle is going to create large holes in your garment. You see if you were to take knit fabric and hold it under a microscope you'd see threads with elastic wrapped around it. Thicker and pointier needles tend to grab the loops in knit fabric and break them thus creating your holes. Knit fabrics need to have ballpoint, stretch or jersey needles that have rounded edges so rather than pierce the fabric it guides into the loops of the threads and can continue stitching. There are a variety of needles so when you are making a project do some research prior.

When choosing fabric it may be tempting to go for flashy and fun, but I recommend sticking to boring and dull until you get more familiar with sewing. I always tell my students to check the clearance bins or buy felt off the bolt in order to save some money. You don't want to spend a lot of money on beautiful fabric only to feel frustrated because your lines or stitching wasn't as professional as you would have liked. Practice on the cheap stuff first!
Lets practice!
In addition to threading, I tell my beginning students to practice stitching on paper. Stitching on paper! Can you do that? You sure can! It helps you get used to sewing a straight line. Print these sheets on 8x11 paper. If you do not have a paper, draw lines onto construction paper or whatever you have on hand and practice stitching. Backstitch at the beginning and end. A backstitch is going in reverse to lock in the stitch. Many machines have a button you push in or hold down to do this. I hold my button down for 5-6 stitches before going forward again. On bigger projects, like quilts, I will also backstitch in the middle of a square to secure the project further. Make sure you practice pivoting by using your handcrank to lower your needle. Good luck! Lets get sewing :)
I love feedback. Please comment below if this was helpful and any questions you may have!


